Uploading 360 Videos from DaVinci Resolve to YouTube: A Step-by-Step Guide
In this guide, we will walk you through the process of uploading 360 videos to YouTube from DaVinci Resolve. Follow these step-by-step instructions to ensure your videos are optimized for a truly interactive viewing experience.
Importance of 360-degree Videos
360-degree videos have revolutionized the way we consume and interact with visual content. Unlike traditional videos, 360-degree videos provide a fully immersive experience, allowing viewers to explore the surroundings as if they were physically present in the scene. This technology has been widely adopted in various fields, including entertainment, education, real estate, and tourism.
For content creators, 360-degree videos offer a unique opportunity to engage with their audience on a deeper level. By providing viewers with the freedom to choose their perspective within the video, creators can deliver a more personalized and engaging experience.
Opening the 360 App and Selecting Files
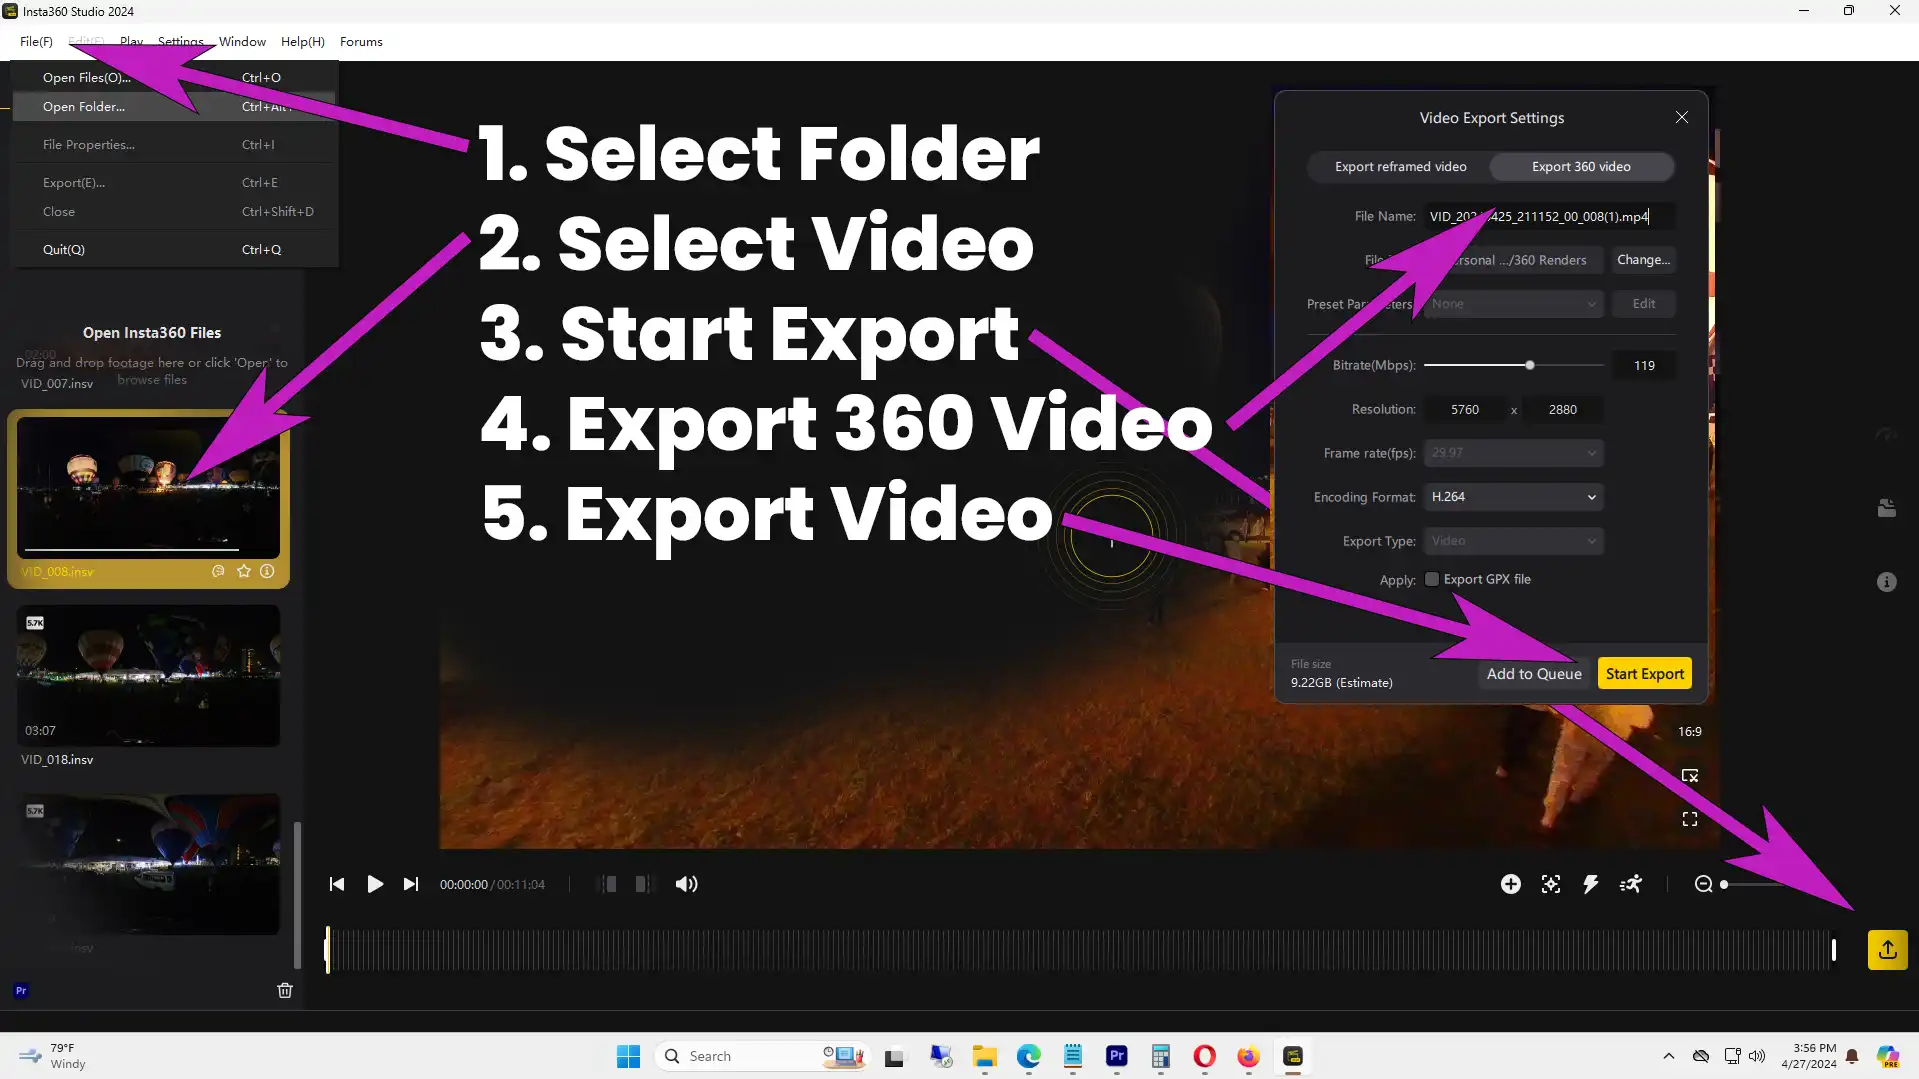
First things first, to start working on your 360 video project, you need to open the 360 app. Once the application is up and running, you’ll be prompted to select the files you wish to work with.
If you’re looking to upload an entire folder containing your 360 video files, simply navigate to the File menu, then select Open Folder, and choose the desired folder where your files are located. A quick double click on the screen will confirm your selection. Follow the on-screen prompts, and in the lower right-hand corner, you’ll find the Export Video option.
Within the Export Video settings, there will be a slider switch labeled Export 360 Video. Be sure to enable this setting to ensure that your video is exported in the 360 format. When it comes to bitrate, a value around 119 megabits per second should suffice for most scenarios. Additionally, it’s recommended to keep the resolution unchanged for optimal quality.
For the file format, consider using H.265 for superior quality at the same bitrate level. However, you have the flexibility to choose an alternative format based on your specific preferences. Once you’ve finalized your selections, initiate the export process by clicking on Start Export. After the video has been exported, it’s advisable to play it back by double-clicking on the file and confirming its playback integrity, possibly using a software like PotPlayer for previewing purposes.
Adjusting Export Settings for Optimal Quality
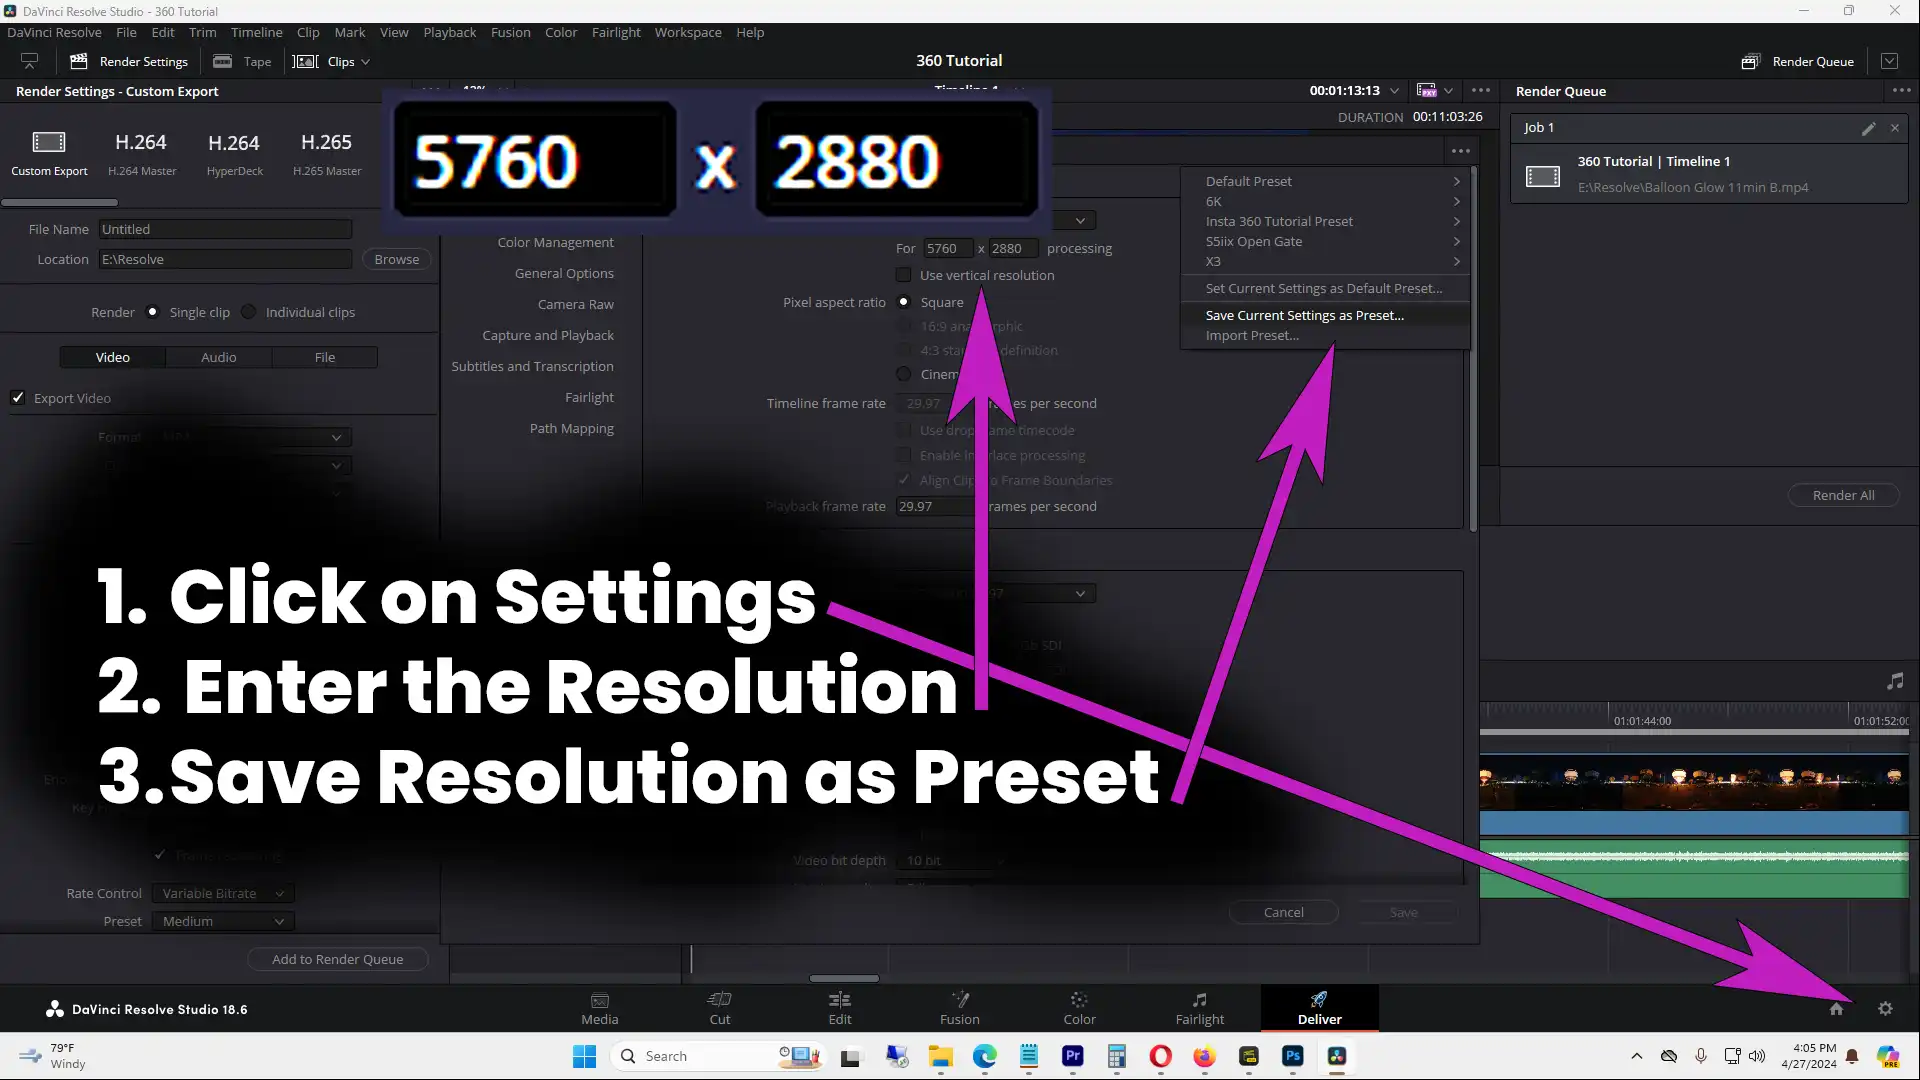
After successfully exporting your 360 video from the dedicated app, the next step involves opening DaVinci Resolve to further enhance and finalize your project. Begin by creating a new project within DaVinci Resolve and assigning an appropriate name to it.
Within the Project Settings of DaVinci Resolve, ensure that the resolution settings align with the footage captured from your 360 device, like Insta360, for instance. It’s crucial to match the resolution values, such as the common 5,760 by 2,280 resolution, for seamless integration. Save these settings as a preset for future projects to streamline your workflow.
Transitioning to the Edit tab in DaVinci Resolve, import your 360 video into the project interface. Make any required adjustments to the frame rate to match the settings within DaVinci Resolve for smooth editing and playback.
While editing your video within DaVinci Resolve, leverage the platform’s capabilities to enhance the visuals through color corrections and editing cuts as necessary. Once the editing phase is completed, navigate to the Deliver section for the final export.
exporting From Davinci Resolve
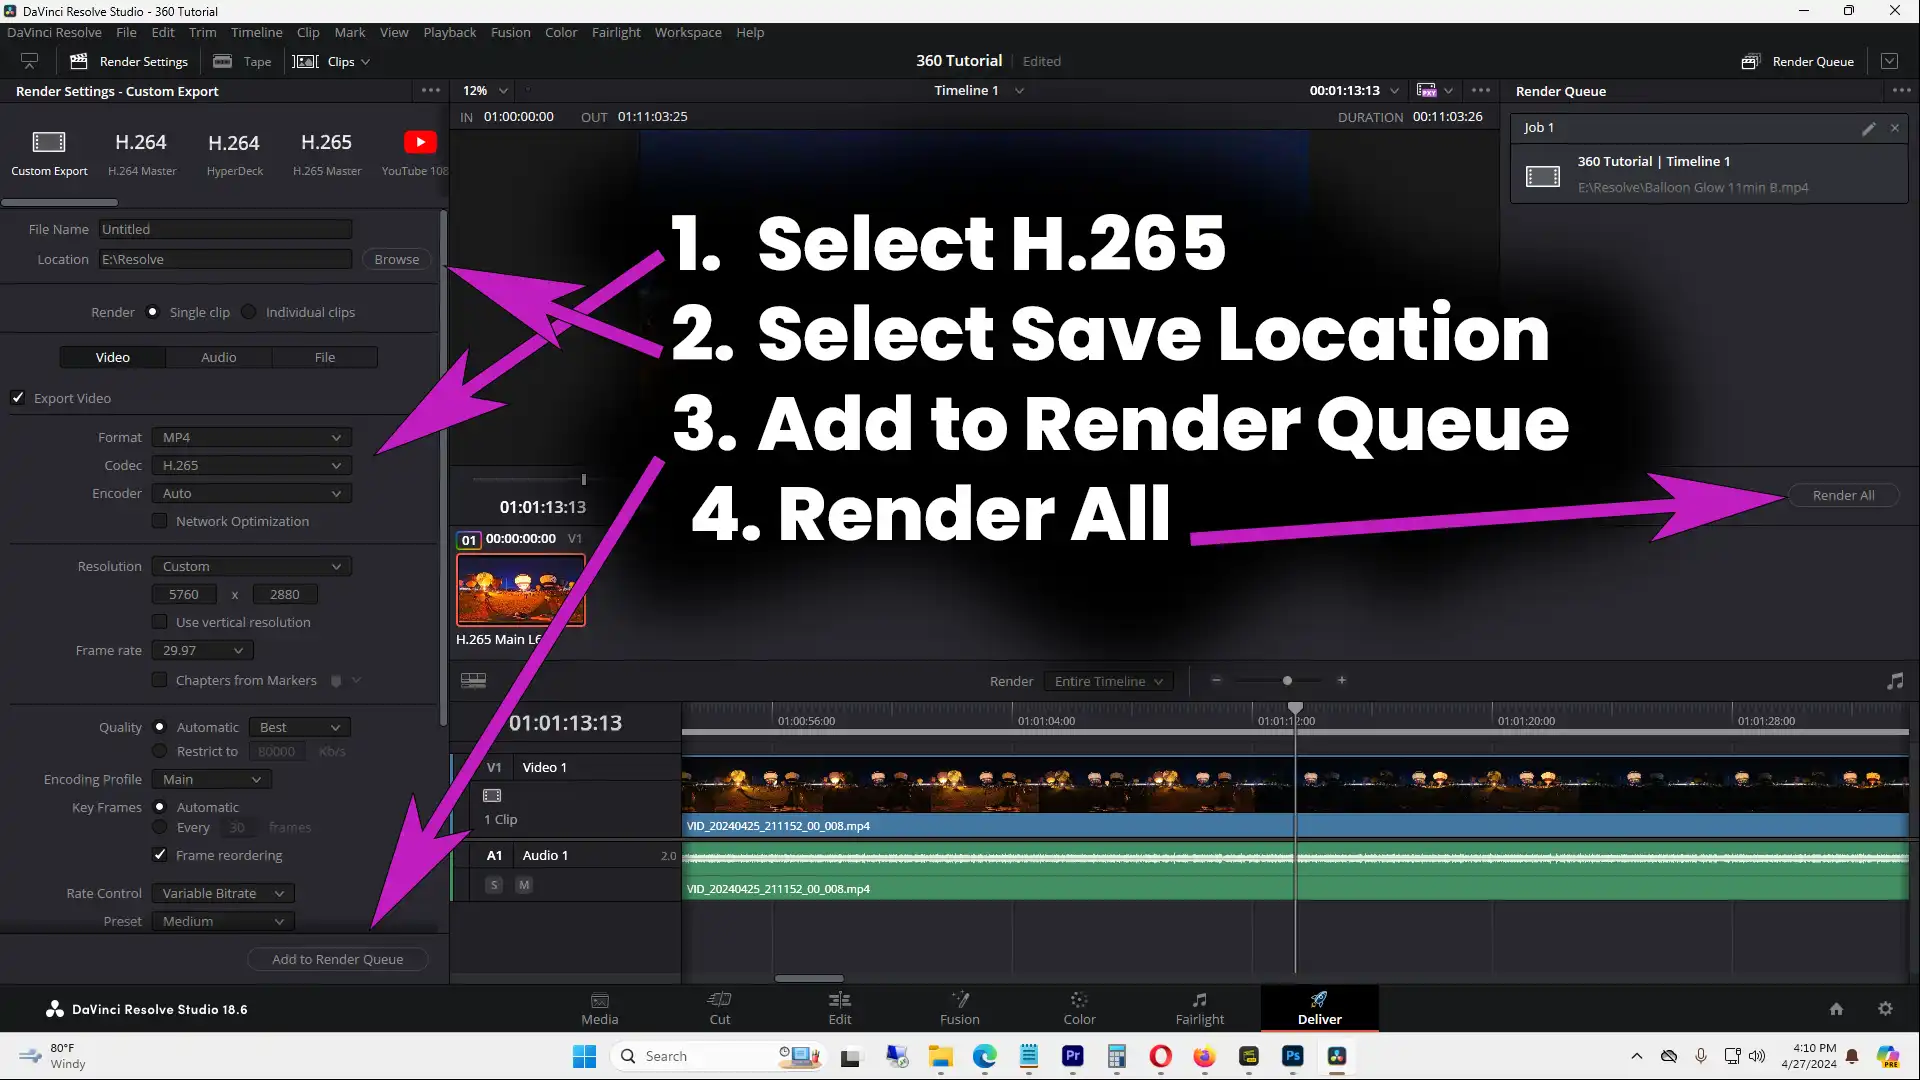
When exporting the video from DaVinci Resolve, opt for the MP4 format for compatibility across various platforms. Since H.264 files are limited in resolution capacity, consider using the H.265 file format for superior quality output. Ensure that the resolution settings align with the project specifications, select a designated file name, set the storage location, and add the video to the rendering queue for processing.
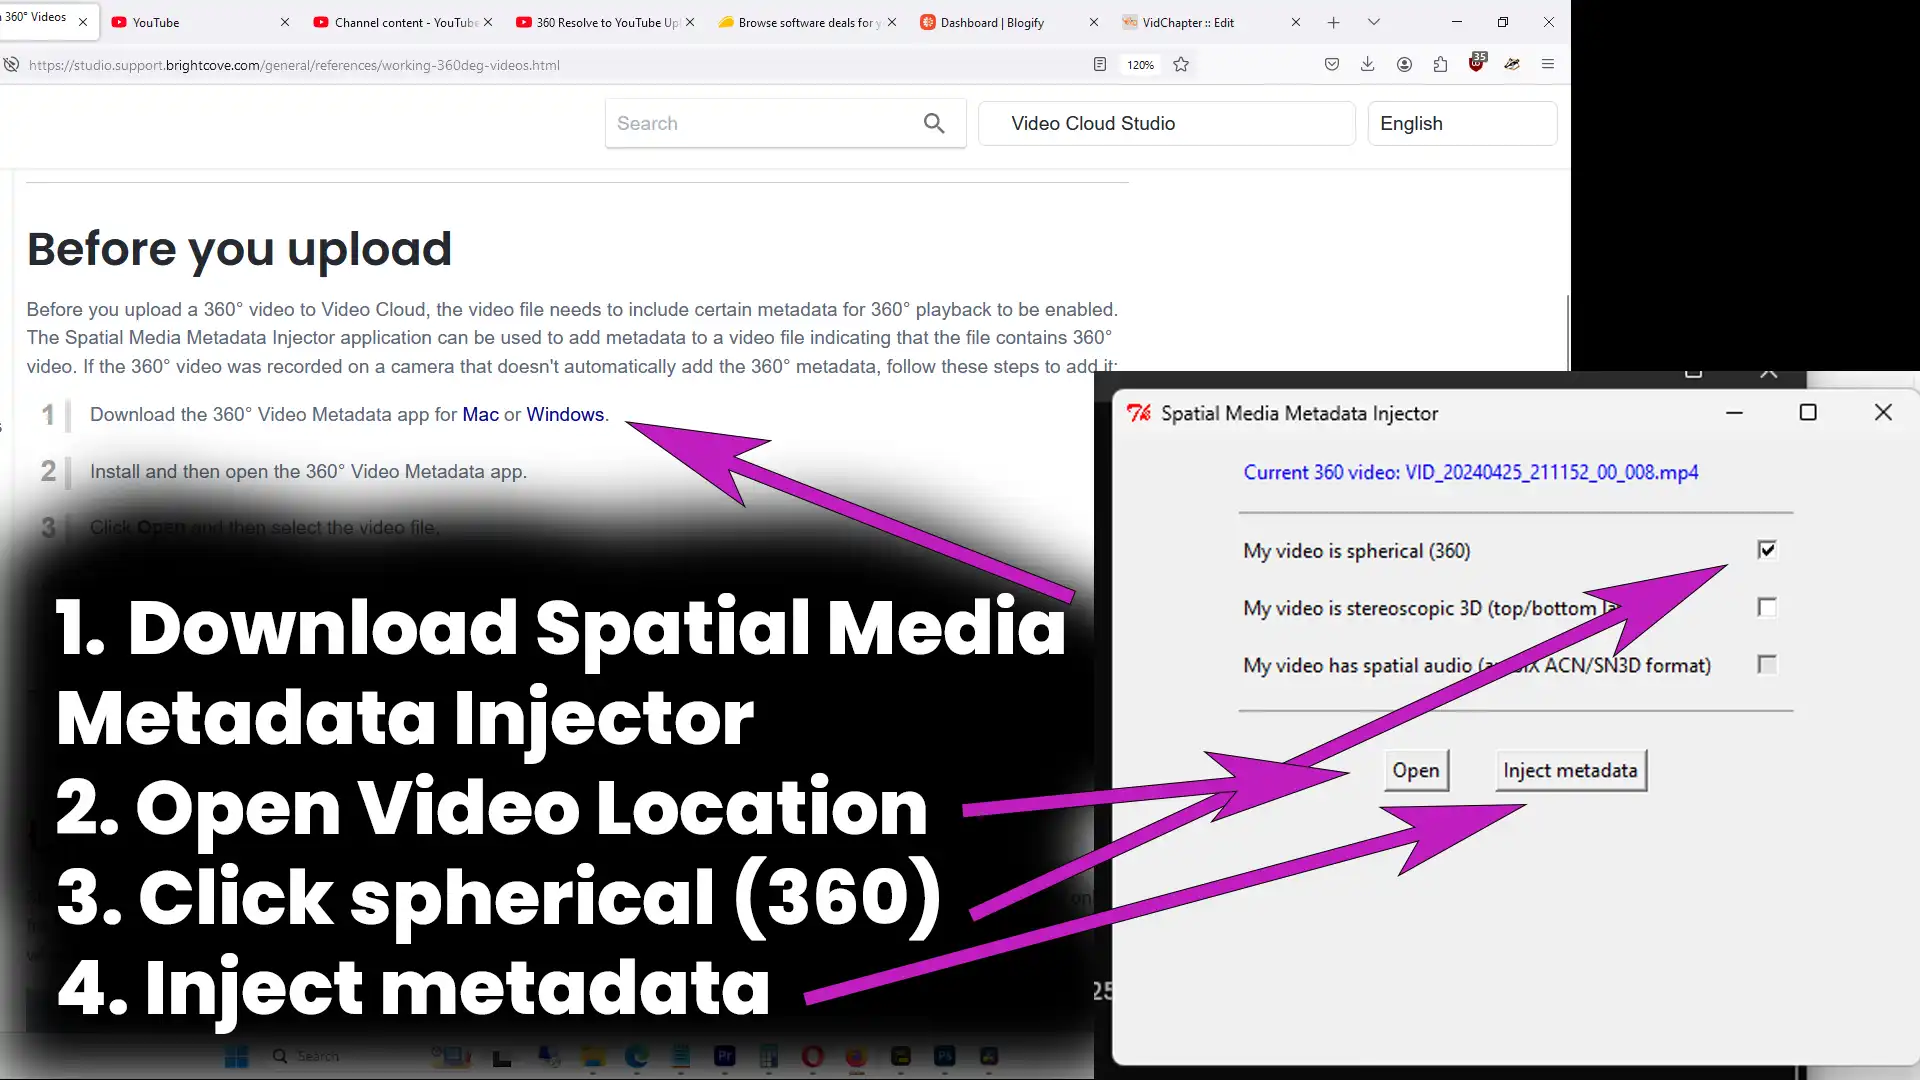
Upon completing the export process, you may notice that the video isn’t interactive in the 360 format when viewed. To rectify this, you’ll need to inject metadata into the exported video file. Visit the provided link in the video description to access the necessary tool for injecting metadata, either for Windows or Mac operating systems.
Injecting Metadata to Enable 360-Degree Interactivity
After exporting your video from DaVinci Resolve, you may notice that it does not play back in 360 as intended. To rectify this, we need to inject metadata into the video file. Here’s how you can do it:
Start by visiting the Brightcove website and downloading their metadata injection program for either Windows or Mac, depending on your operating system.
Open the downloaded program and select the exported video file that you want to add the metadata to.
Ensure that the ‘Spherical 360’ option is selected within the program to indicate that the video is intended for 360-degree viewing.
Click on the ‘Inject Metadata’ button to embed the necessary information into the video file.
Save the video with the injected metadata. Be aware that this process might take a bit longer for larger video files.
By injecting metadata using tools like the Brightcove program, you are essentially telling compatible platforms, like YouTube, that your video is meant to be viewed in a 360-degree format. This metadata is what enables viewers to interact with the video by changing their perspective while watching.
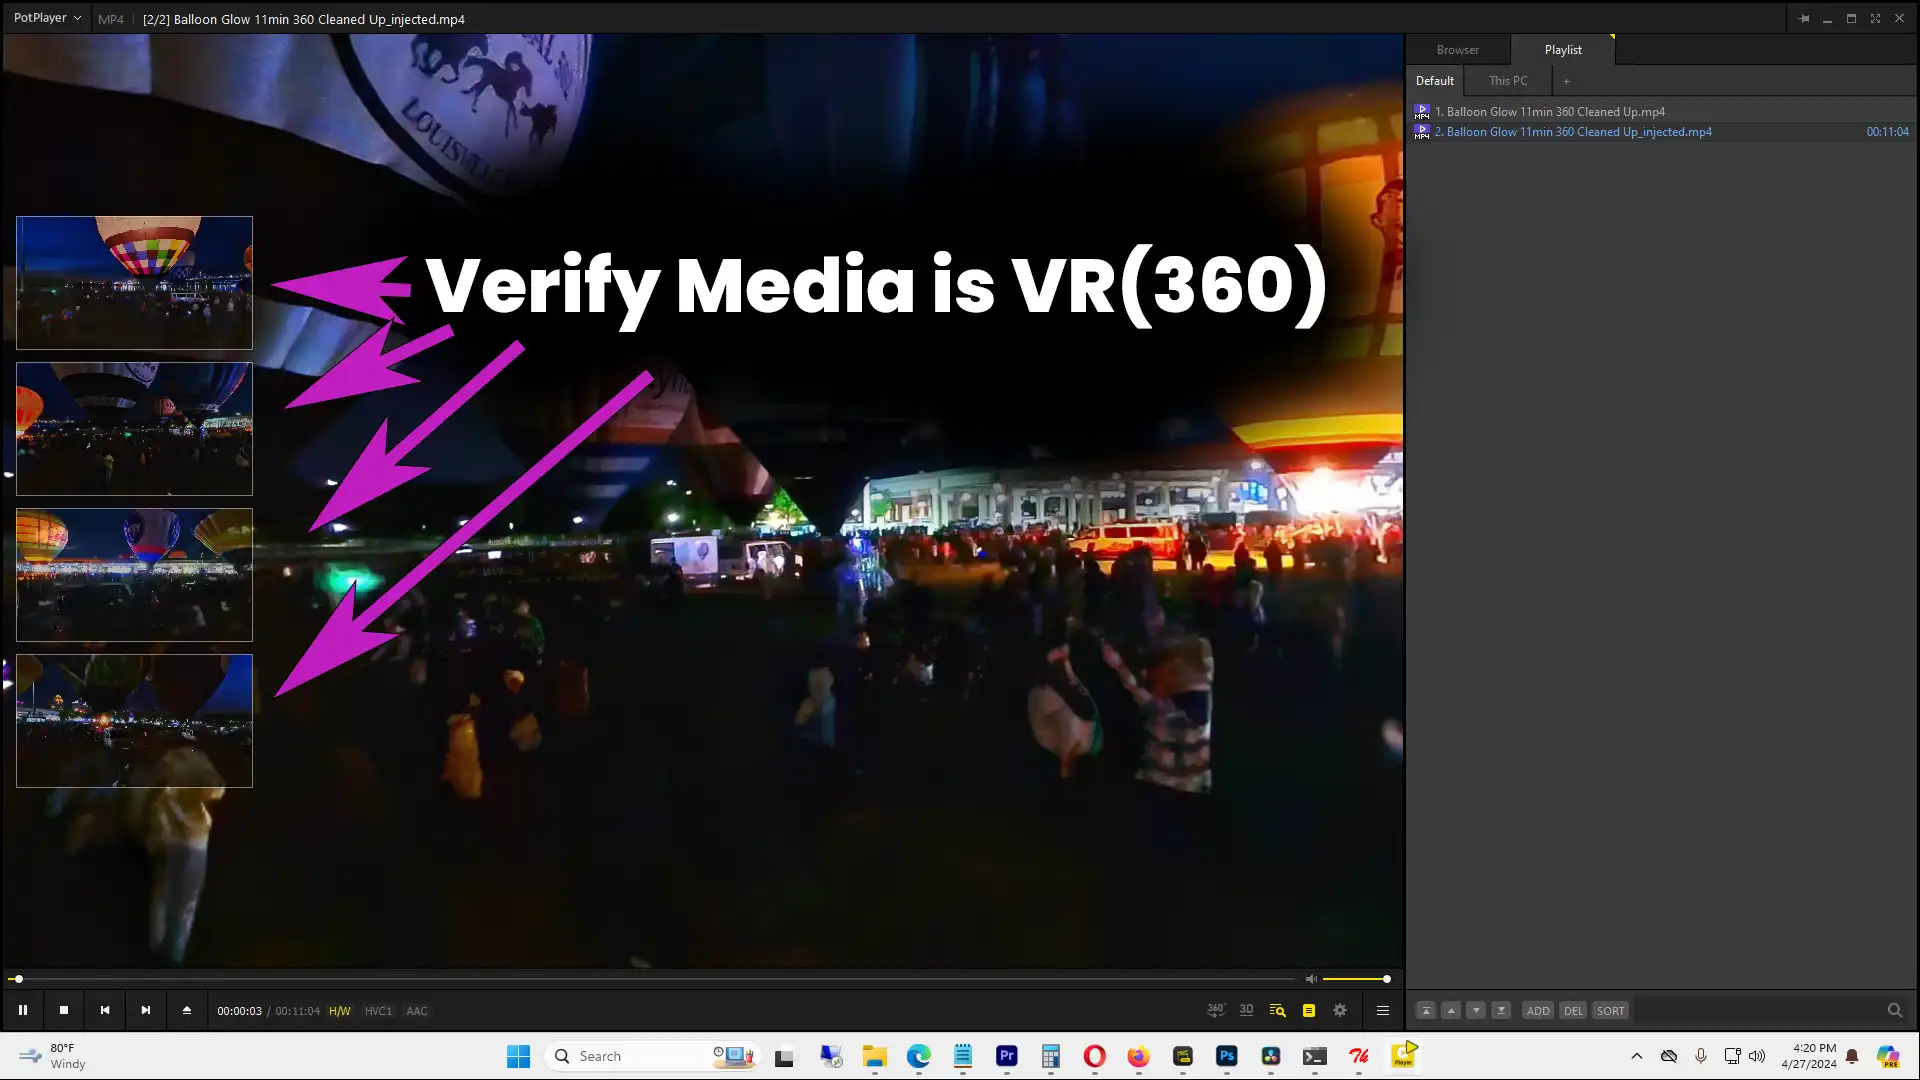
Verifying Video Playback and Quality
Once you have injected the metadata into your video file, it’s essential to verify that the playback and quality meet your expectations. Here’s how you can ensure that your 360 video plays back correctly:
Open the video file using a suitable media player that supports 360-degree videos, such as PotPlayer.
Use the player’s features to navigate around the video and confirm that the 360-degree interactivity is working as intended.
Pay attention to the video quality and ensure that it maintains its sharpness and clarity during playback.
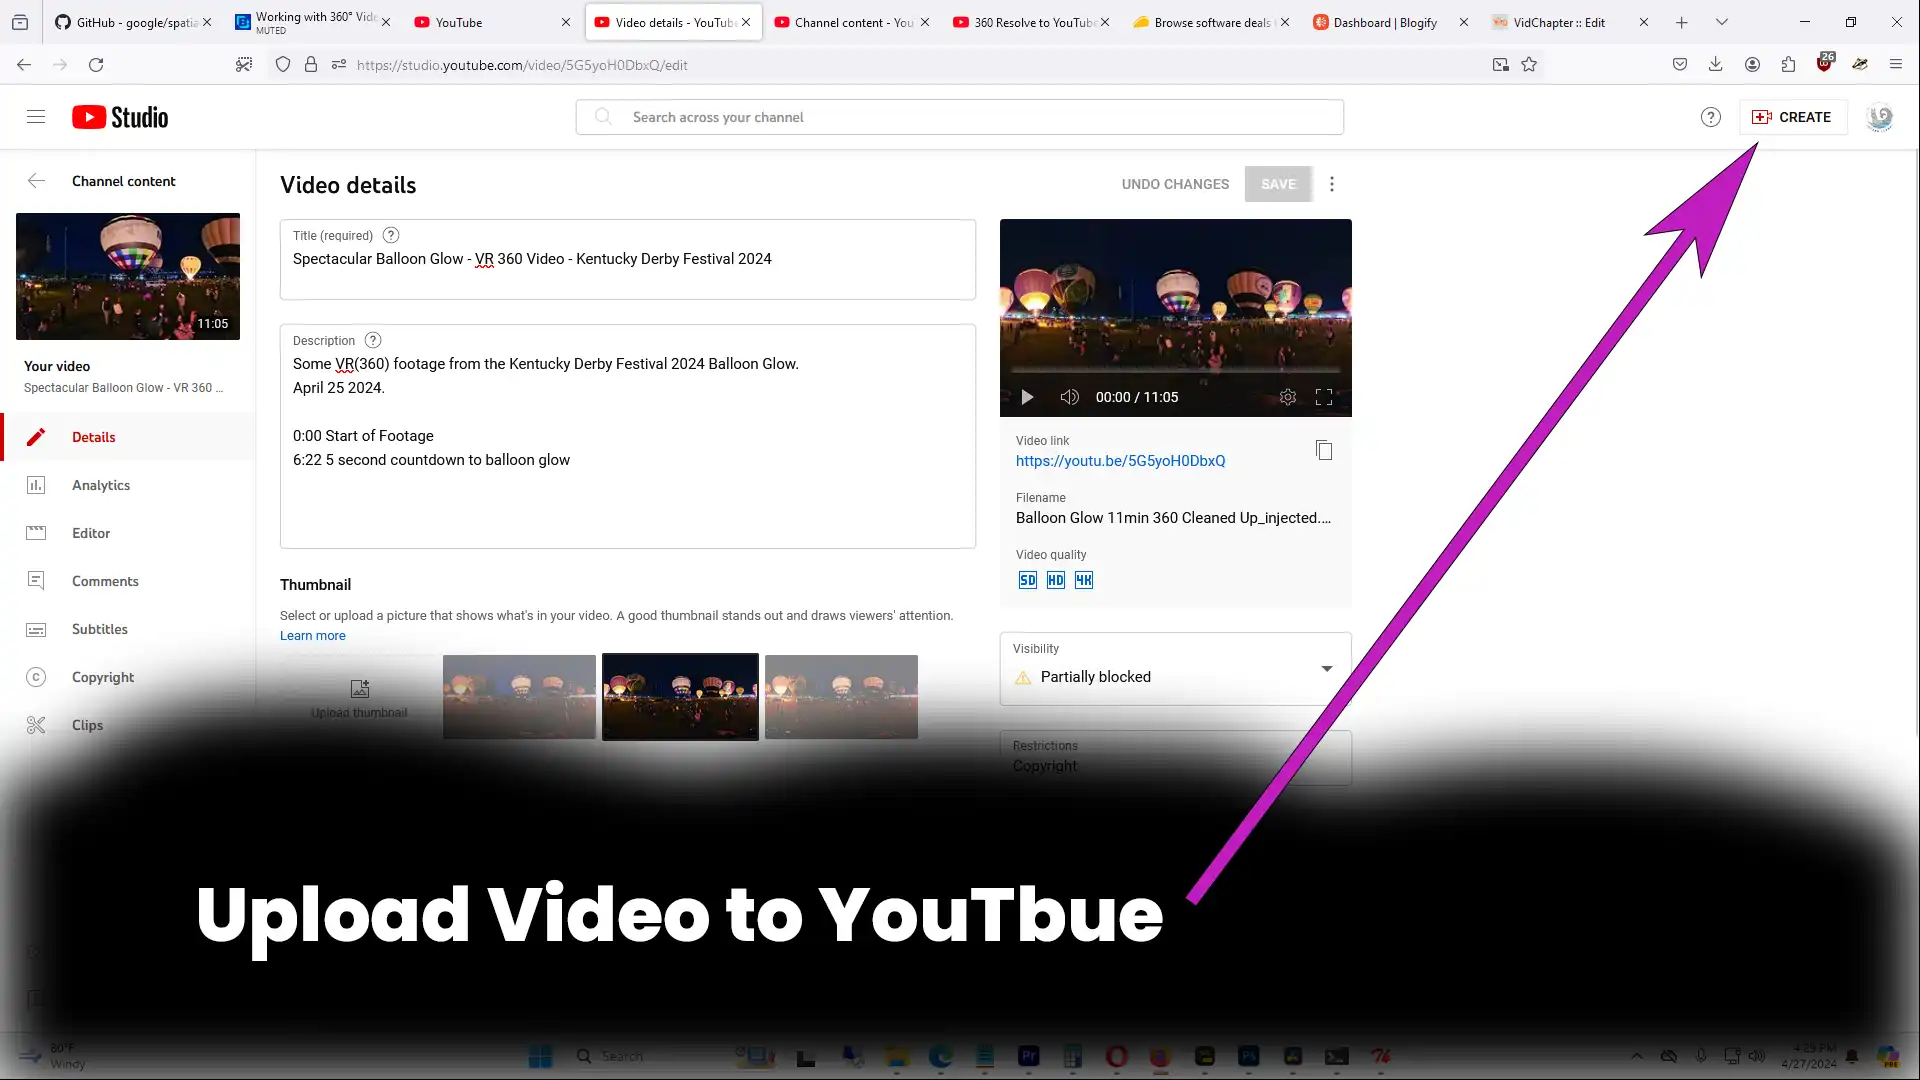
Uploading to YouTube
Once you have successfully added the necessary metadata to your video file, it’s time to upload it to YouTube. Creating a new video on your YouTube channel, you can select the file you just injected the metadata into and begin the upload process.
Remember, uploading a 360 video to YouTube may take some time depending on the file size and your internet connection speed. It’s essential to ensure that your video has completed uploading before proceeding.
Ensuring 360 Compatibility
When your video is fully uploaded, viewers will be able to interact with it by moving the video around, just as we demonstrated at the beginning of this process. Your audience can immerse themselves in the 360-degree experience you’ve created, enhancing viewer engagement and providing a unique perspective on your content.